|

|
Follow the instructions below, or if you prefer to watch a movie that shows how to setup and use WS_FTP, select one of these:
| Configuring your site |
| Transferring files |
| Managing your files |
In order to FTP into your website you will need the following information which was included in your account activation notice.
USERNAME
PASSWORD
FTP HOSTNAME (your domain name like fred.com, or your IP address)
When you have this information and a copy of
WS_FTP Professional or WS_FTP Home
installed on your computer,
you will be ready to setup a profile and FTP into your website.
If you prefer to use a free FTP program, you can choose from many free FTP programs at TUCOWS
and the setup will be essentially like this (you will likely need only specify the host, user and password
but they may call them different things). Please note that you will be on your own getting other FTP programs to work.
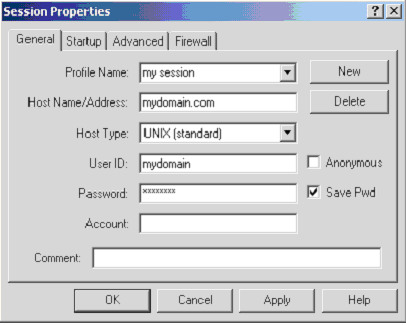
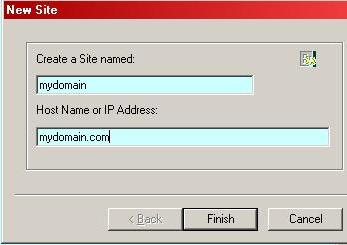
1. Launch your WS_FTP program. A panel (titled Session Properties or Connection, depending on what version you have) will be displayed with the WS_FTP program window behind it.
2. Click the New or New Site button and type a Profile name into the "Profile Name" or "Create a Site Named" entry box at the top of the panel. This can be any name you choose, "My Website" for example.
3. Enter the appropriate information
into the following entry boxes:
|
|
|
4. Click on the Apply or Save button at the bottom of the panel to save this Profile. This will eliminate the need for you to enter this information the next time you launch WS_FTP.
5. Click on the OK button at the bottom left of the panel. WS_FTP will now attempt to connect to your website. When you are connected to your home directory on the server, the Profile panel will close.
Left Window
WS_FTP will now display a split screen. The window on the left contains the folders and files on your own computer. Use the green arrow at the top of the window and the scroll bars to browse your system.
Right Window
The window on the right will contain the folders and files contained within your home directory. This is your space on the server. This is where you will place your website. You will see folders with names such as www, infobots and access-log.
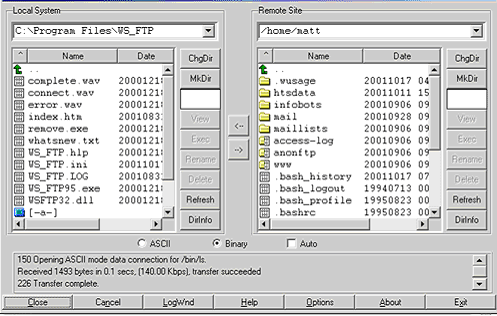
Binary vs. ASCII or Auto
You will see two radio buttons below the display windows, one labeled Binary and one labeled ASCII . There will also be a check box labeled Auto. If you select Auto WS_FTP will automatically apply the correct setting, either Binary or ASCII to the document you are transferring. If you elect not to use the Auto setting please note that it is very important to transfer images in Binary mode. Everything else, HTML documents, cgi scripts etc. should be transferred using ASCII mode. If you fail to set this correctly your files may not appear as they should.
Upload Files
1. Double click on the www directory in
the right window to open it. This is the directory you will upload your web
pages, files, images etc. into.
2. Highlight a file (or files) from your
computer in the left window.
3. Click the right arrow button (->)
in the center bar between the windows.
4. You will see a note in the status bar
at the bottom when your file transfer is complete.
Download Files
1. Double click on the folder you want
to download files into on your computer to open it in the left window.
2. Highlight the file (or files) you wish
to download from your website in the right window.
3. Click the left arrow button (<-)
in the center bar between the windows.
4. You will see a note in the status bar
at the bottom when your file transfer is complete.
Create A New Directory (Folder)
To create a new directory on your website, click on the MkDir button when you are inside the www directory or a subdirectory of the www directory. You will be prompted to enter a name for the new directory. Once you do this, the new directory will be created.
Multiple File Transfer
To transfer more than one file at a time, highlight the first file, and then hold down the Ctrl key on your keyboard to select more. All highlighted files will be transferred when you click on the appropriate arrow button to begin the transfer.
Disconnect
When you are finished transferring your files, click on the Close button
at the bottom of the WS_FTP window. This will close your FTP connection.
The WS_FTP Pro Support Center, contains links to many helpful documents.